Tuesday, December 15, 2009

Cupcake Tips & Bakery Frosting Recipe

Cupcake tips

To achieve a tradition cupcake shape, it must be filling inside the paper line at least 2/3 full.
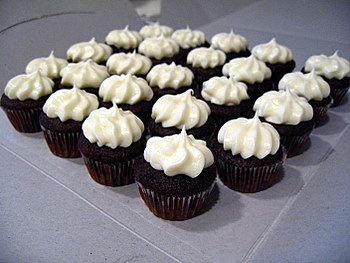
Mostly the cupcake recipes yield between 18 – 24 nos. of cupcakes.
Use sprinkles is one of the quickly embellish a frosted cupcake.
Frosted cupcakes should be kept in an airtight container in the refrigerator.
Cupcakes without frosting store well in the freezer.


Bakery Frosting Recipe


2 Cups Shortening
½ Cup Nondairy Creamer
1 teaspoon Almond Extract
1 package (32 ounces) Confectioners Sugar
½ to ¾ Cup Water
Food coloring (optional)

Use a large mixing bowl and beat together the shortening, creamer and extract. Gradually mix in the sugar. Then add enough water for desired consistency. Store in the refrigerator and bring to room temperature before using.

Sunday, November 15, 2009

Cake Decorating Guidelines & Technique

In the direction of be successful when baking cakes and pastries, study the fundamentals about baking. This will guarantee that baking is enjoyable and your cakes will be all the frenzy for your visitors or family. Initially, the observable, but occasionally beyond rule: Preheat the oven 20 to 30 minutes earlier just before use. Get shortcuts by make softer butter inside the microwave for 5 second till soften, but not dissolved. At all times make sure to have unsalted butter for baking.

Apply quality ingredients by making sure that they are not expired. For vanilla essence, make use of pure extort rather than simulation. Get ready your cake pans before make the batter by covering the pan with butter and then flour. Butter the pan, if parchment is used then add the parchment paper cut to size and butter the paper, and put in flour, patter out excess. Warm up the eggs hastily to room temperature by insertion them in tepid water for 10 minutes. As mix the ingredients, begin at a low tempo and mix just until even.

Scour the sides and bottom of bowl frequently as you mix up. Well there are quite a few ways to tell if your cake is complete baking. Firstly, by insert a toothpick into the middle of the cake. Once it comes out totally spotless, the cake is ready. Otherwise, you can see that the cake is starting to drag away from the sides of the pan and it is spongy to the touch, it is done. Get the cake away of the oven, leasing it respite in the pan for 10 or 15 minutes. After that transfer to a wire rack to chill totally.

Constantly level the layers by cutting off the pitch with a notched knife. This will make sure a good-looking, regular cake for all occasion. Insert strips of wax paper underneath your cake once you have placed it on your cake plate. These will be detached after frosting to reveal a clean cake plate. Concern a slim coat of frosting and chilled for 15 minutes before applying the thicker layer of frosting. They will close in the crumbs for an easier request and better look. Pursue these simple guidelines for cake baking, and your cakes will come out wonderful and ideal.

Sunday, October 18, 2009

CUPCAKE CAKES

cupcake cakes image
A Few Tips For Making Cupcake Cakes


TIPS NO:1

To begin your own cupcake cake, you have to prepare a foil-lined cake board or a sheet of cardboard which is wrapped with aluminum foil. Since the cake are easy to move, you have to make sure the cake have a wobbly base especially with a cupcake cake. It is most important to have a good stability and easy to transfer the goods as little as can be.

TIPS NO:2

Before you start, you have to do layout first by using paper circles so that you know where exactly to put your cupcake; also to avoid them all go down and make sure they all can fit on your base.

TIPS NO:3
Usually leave the cupcakes in their paper liners is a good idea. Beside that it's easier to stick them to the cake board, stable and even. Place the cupcakes close to each other, once you have decided with the shape of your cupcake and put a little of icing around the bottoms of the cupcakes.

TIPS NO:4
Obviously some cupcake cakes are made from cupcakes but other at first glance similar look like regular cake. Let say, if you want a regular cake, treat the cupcakes and visualize it as a single unit. Once you frost the cupcakes, used your knife or spatula to sweep over the cupcakes in one motion. By using a thicker frosting it can clear the gaps between the cupcakes. You also can use a decorating bag to draw smooth motions along the perimeter or across cake.


It is fun to make you own cupcakes cakes during family occasion or celebrate party. You'll have an original image as well as the size of your cakes. Hope you'll enjoy the tips for making your own cakes out of cupcakes.

Wednesday, September 2, 2009

MINI CHOCOLATE CUPCAKES

cupcakes imageFor me I really love baking for big groups of people especially friends and family which I often to try out new recipes for any occasion or gathering. I usually bake in a large quantities but make sure it is easy to make and the ingredient must be always enough and easy to find in the glossary shop.

These mini cupcakes are smaller than normal cupcakes and easy to make. The recipe actually makes enough for 4 dozen mini cupcakes sometimes even more. For what you realize it only take about two or three bites and talking about 4 dozen it doesn’t feed so many people. During parties, people are coming rarely eat that much dessert if there are various types of desserts. Where everyone can eat the whole mini cupcake with no waste, meaning to say they not go back for seconds or most probably no need to provide extra. The recipe I want to share to your all is called “
Mini Chocolate Cupcakes”.


Mini Chocolate Cupcakes with Cream Cheese Frosting (Topping)

The ingredients:-
• 1 1/2 cups all purpose flour
• 2 tsp instant coffee powder (optional)
• 1/2 cup cocoa powder
• 1 tsp baking powder
• 1 cup sugar
• 3/4 cup milk (prefer low fat)
• 1/2 tsp baking soda
• 1/2 cup vegetable oil
• 2 tsp apple cider vinegar
• 1/4 tsp salt
• 1 tsp vanilla extract

First the oven must be heat up to 350F. Prepare 48 muffin cups with paper liners. Then in separate of a large bowl, put all the purpose flour (after sift), cocoa power, instant coffee powder (optional), sugar, baking soda, baking powder and salt.

Secondly, whisk all together the milk, vegetable oil, vinegar and vanilla extract in medium bowl. Mix it with the dry ingredients and start to stir until it well combined with no streaks. Lastly pour the batter into the muffin cups by filling each about ¾ full and bake around 10 – 12 minutes until the center comes out clean. Later turn cupcakes out form the oven to make it completely cool before we do topping.

The ingredients:- Cream Cheese Frosting (Topping)
• 6 oz cream cheese (room temperature)
• 6 tbsp butter (room temperature)
• 1 tsp vanilla extract
• 1 – 2 tbsp milk / cream
• 2 – 3 cups confectioners’ sugar

Mix the cream cheese and butter in a large bowl. Then pour in vanilla, milk and slowly add the confectioners’ sugar until this frosting reaches the desired consistency. Fill the frosting inside a pastry bag with a star tip and begin to frosting onto the top of cooled mini cupcakes. For this type of portion, we can make up around 4 dozen cup cakes.


Thursday, July 23, 2009

Making A Simple Photo Cake

photocake image

When we attend any party especially birthday party, sometimes we noticed that they is an image or photo on top of the cake. For example image of them children or cartoon character. This is one of the trends nowadays. It shows that it is different with other cake which is usually using an icing only to decorate the cake.

Most people now like to put photo or something on top of the cake. This is called a “PHOTO CAKE”. To make this photo cake is very simple; all you have to do is just provide your favorite photograph to the baker. The baker then will adorn the cake by copy the photograph.

Then the baker will printed out the image of the photograph on a special “icing paper” made of cornstarch, potatoes or even rice after scan the provided photograph. They also use a special ink for print out the image or picture onto the icing paper, which is made from food coloring.

It won’t affect the taste and overall look of the cake, even though the icing sheet is add an extra thin layer because it can dissolve once they are placed on top of cake which only leaving the photograph behind. It’s so simple; we also can make our own photo cake at home, provided we have the entire ingredients and all the equipments. Hope you also can learn how to make a simple photo cake at home.